Coffee Brewing
Brewing coffee is an art with many methods, each offering a unique flavor and experience. In this guide, we'll introduce several popular brewed coffee methods and explain how to use them. We'll keep things friendly and simple – no advanced jargon, just the basics to get you started. From the bold French press to the smooth cold brew, there's a brewing style for everyone. Let's explore these methods one by one!
French Press
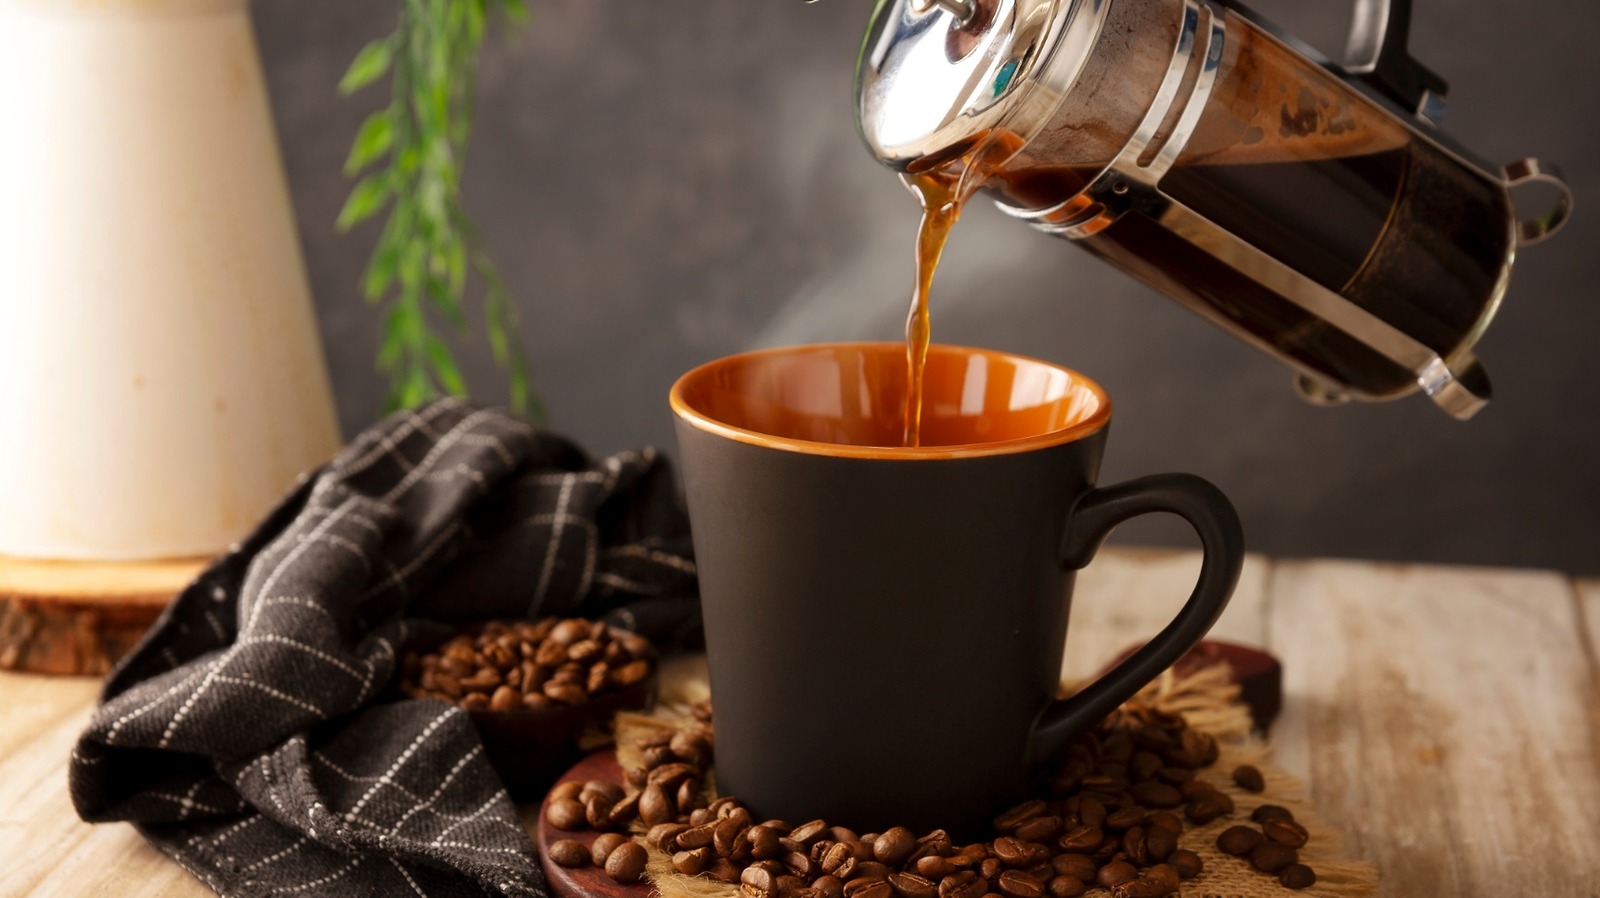
The French press is a classic immersion brewer known for producing a full-bodied, robust cup of coffee. It uses a simple device: a carafe with a plunger and metal mesh filter. Coarsely ground coffee is steeped directly in hot water, which allows the coffee's natural oils and fine particles to remain in the brew. This results in a richer flavor and heavier mouthfeel than filter coffee. French press coffee tends to be smooth and strong without being bitter, making it an excellent choice for those who enjoy a bold taste.
How to Brew (French Press):
- Add Coffee: Put coarse ground coffee into the French press (about 1 to 2 tablespoons per 6 ounces of water, or roughly a 1:15 coffee-to-water ratio).
- Add Water: Pour in hot water (just off the boil, around 90–96°C or 195–205°F) over the grounds. Make sure all the coffee is saturated.
- Steep: Give a gentle stir, then place the lid with plunger up. Let the coffee steep for about 4 minutes.
- Plunge: Slowly press the plunger down to the bottom. The mesh filter will separate the grounds from the liquid.
- Serve: Pour the coffee into your mug and enjoy. French press coffee is best served immediately so it doesn't over-extract. (Tip: If you're not serving it all at once, transfer it to another container to avoid the coffee sitting on the grounds.)
Pour-Over Coffee
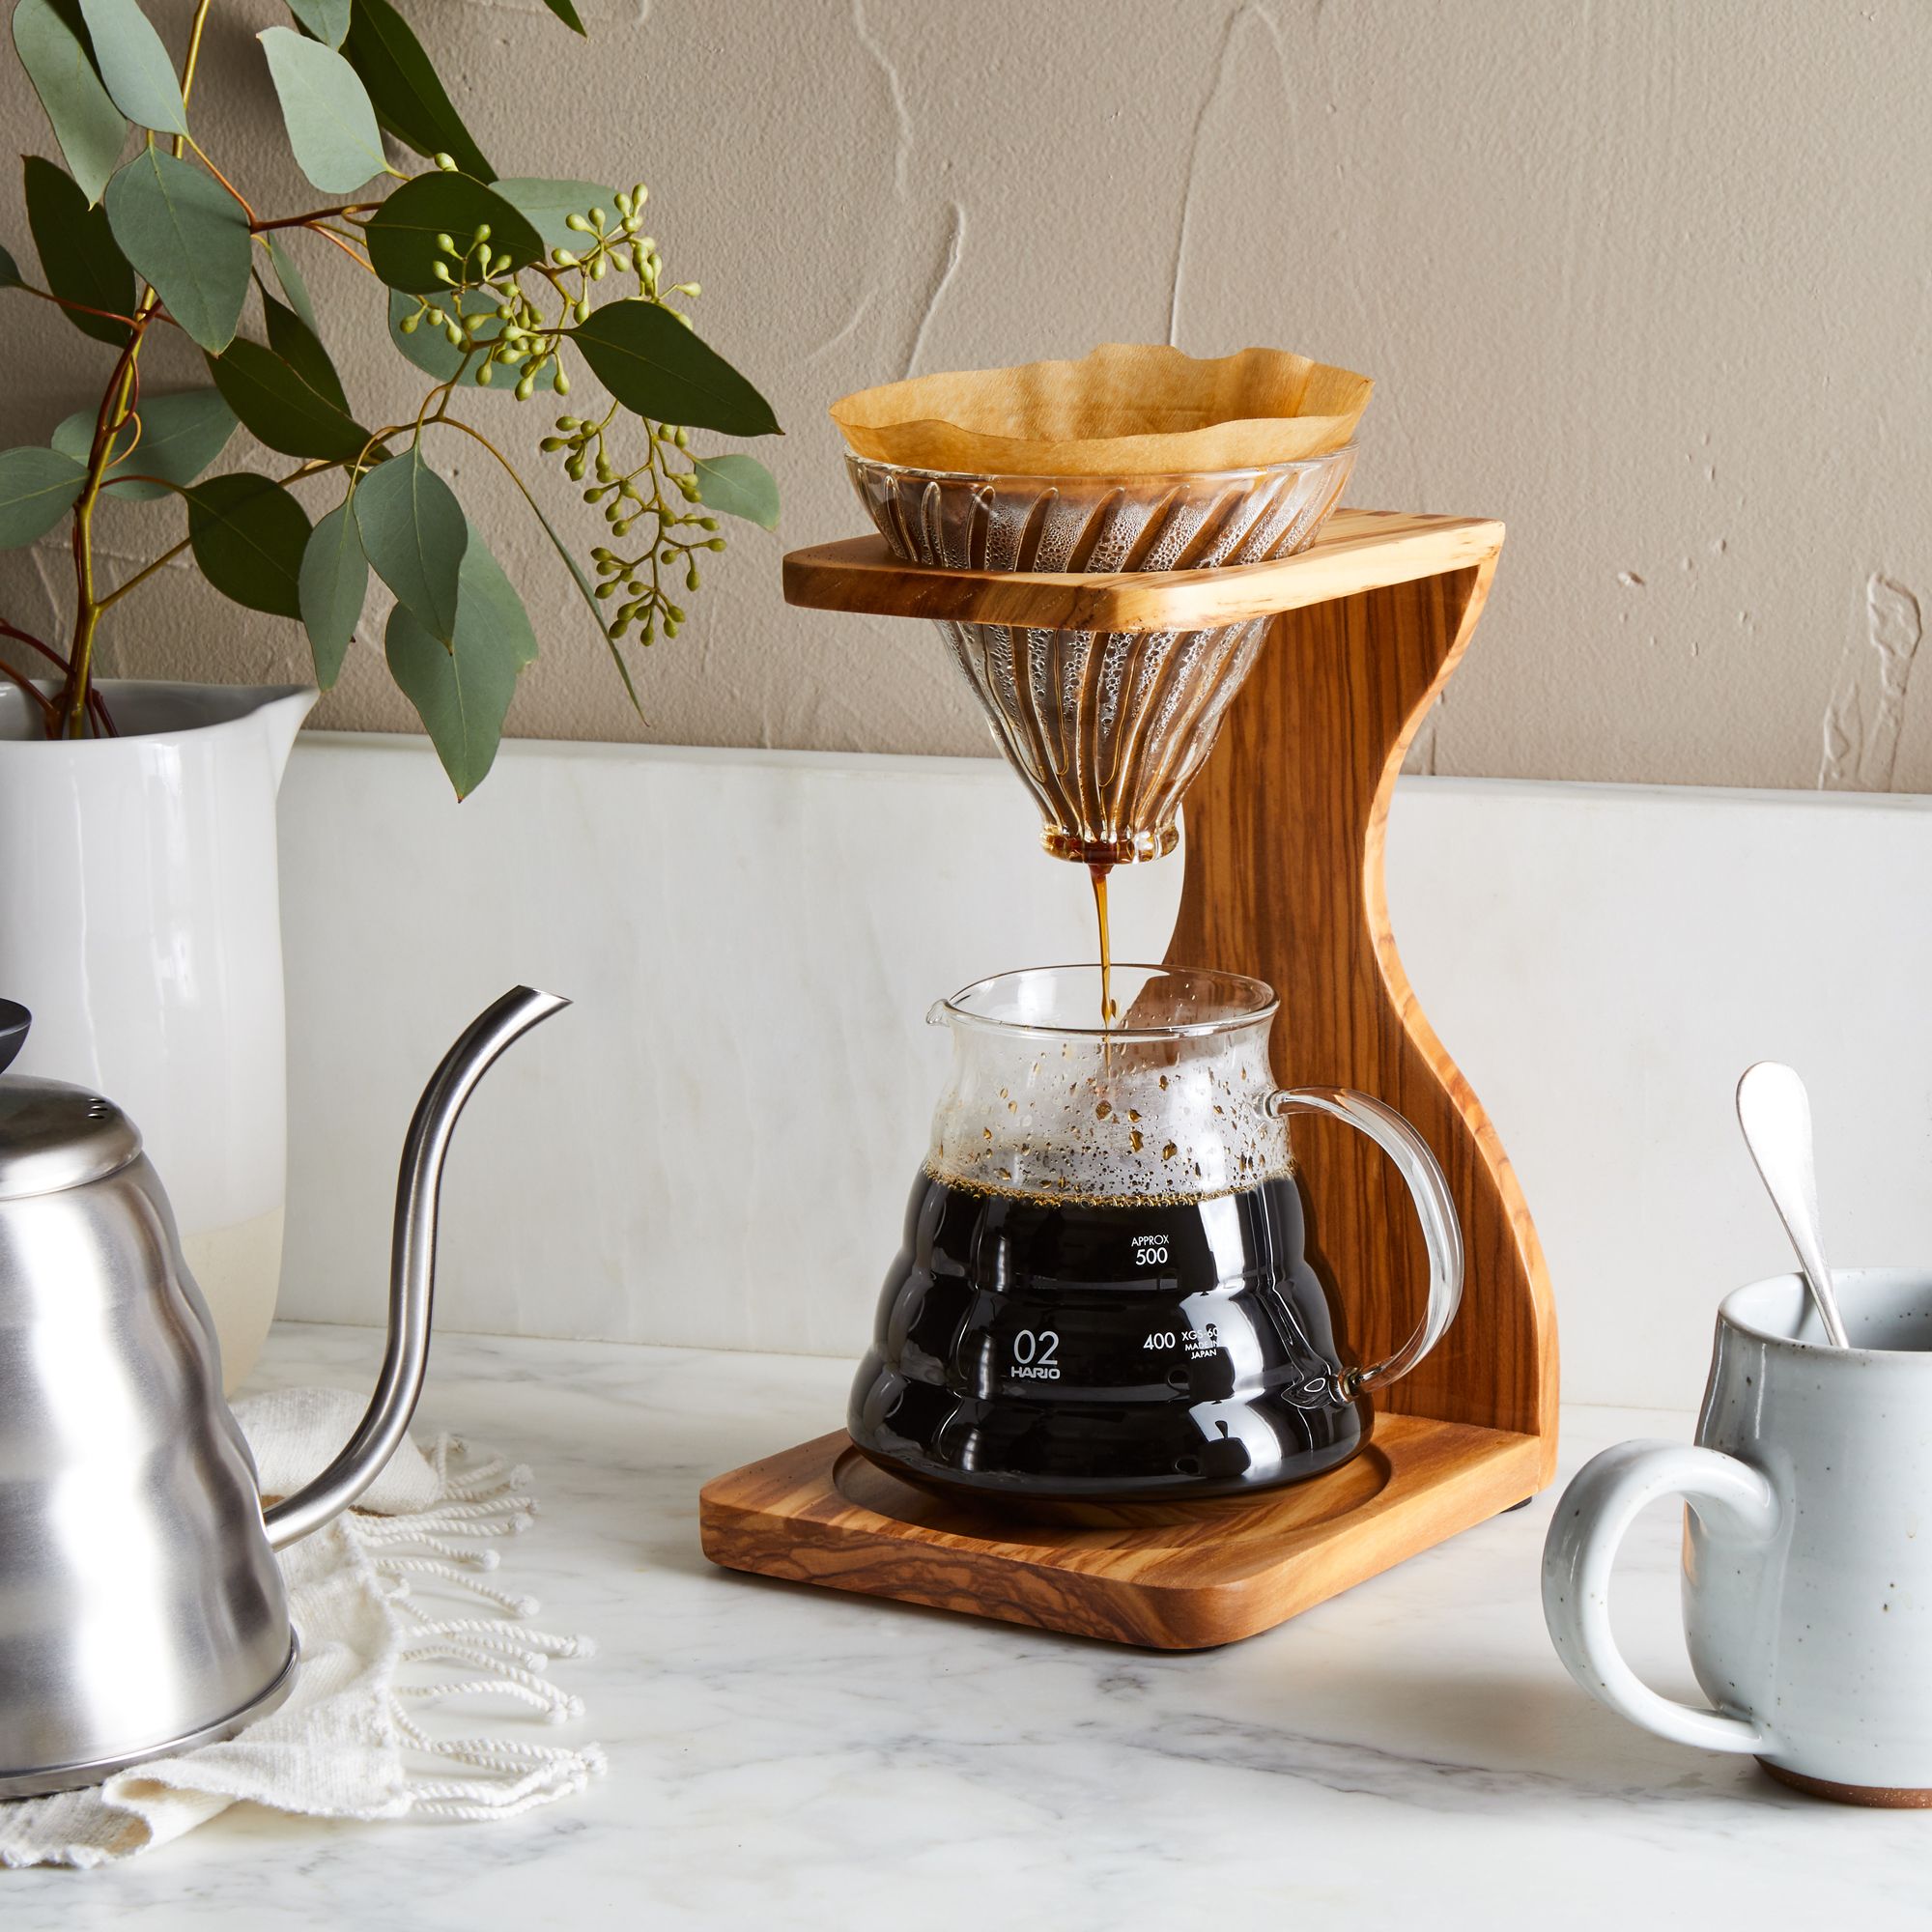
Pour-over is a manual drip brewing method prized for its clarity and bright flavor. In a pour-over, hot water is poured over medium-ground coffee in a paper filter, and the brewed coffee drips into a cup or carafe below. This method filters out most oils and sediments, resulting in a clean, light-bodied cup with balanced acidity. Pour-over brewing also gives you a lot of control over the process – you can adjust your pouring technique to highlight complex flavors and get a consistent, clean brew. It's a favorite of coffee enthusiasts because it often highlights the unique notes of single-origin beans (like fruity or floral tones).
How to Brew (Pour-Over):
- Setup: Place a paper filter in your pour-over dripper (such as a cone dripper or Chemex) over a cup or carafe. Optionally, rinse the filter with hot water and dump the water out to remove any paper taste.
- Add Coffee: Put medium to medium-fine ground coffee in the filter (about 1 to 2 tablespoons per 6 ounces of water, or roughly a 1:16 ratio). Gently shake to level the grounds.
- Bloom: Pour a small amount of hot water (95°C/205°F, just off boiling) over the grounds – just enough to wet them. Wait about 30 seconds. This "blooms" the coffee, allowing gases to escape and prepping for better extraction.
- Slow Pour: Continue pouring hot water slowly in a circular motion, starting from the center and moving outward, keeping the water level steady. Pour until you reach the desired volume of coffee. The water will drip through the coffee into your vessel.
- Finish: The total brew process should take around 3–4 minutes for a cup or two. Once the dripping slows to a stop, remove the filter and enjoy your freshly brewed coffee. The result should be a clean, well-balanced cup with lots of aroma.
Espresso
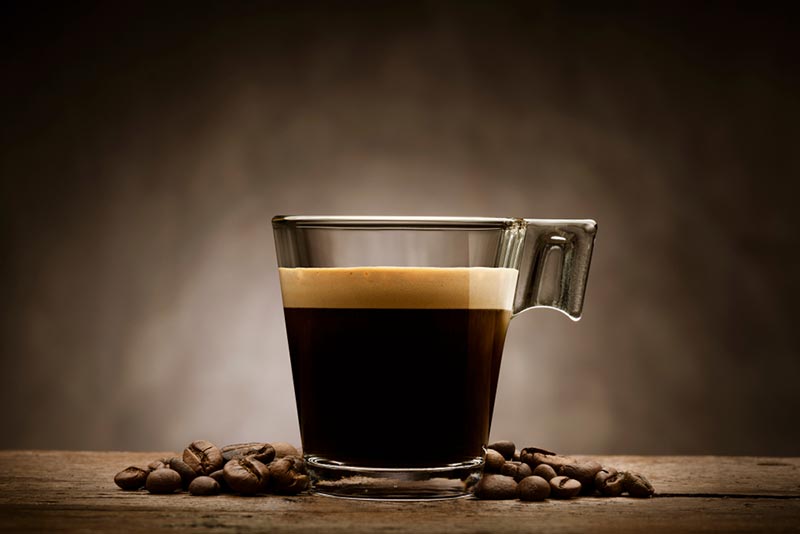
Espresso is a brewing method that uses pressure to produce a tiny, concentrated cup of coffee with intense flavor. Unlike other methods, it requires an espresso machine (or a similar pressurized device) to force nearly boiling water through a puck of finely ground, tightly packed coffee. The result is a shot of about 1–2 ounces of coffee that is very strong and rich, typically topped with a layer of creamy foam called crema. Espresso has a bold, concentrated taste and a thicker body than regular drip coffee. It's the foundation for many popular coffee drinks (like lattes and cappuccinos), but it's also enjoyed on its own by those who love a strong coffee kick.
How to Brew (Espresso):
- Prepare the Portafilter: Grind your coffee very fine (espresso grind). Scoop about 7 grams for a single shot (or ~14 grams for a double) into the portafilter basket (the handle with a little cup). Level the grounds and tamp them down firmly and evenly using a tamper. This creates a compact "puck" of coffee.
- Lock and Brew: Attach the portafilter to the espresso machine's group head. Place a small espresso cup underneath. Start the machine to pump hot water through the coffee.
- Extraction: The espresso should begin to drip out and then flow in a thin, steady stream. Let it brew for about 25–30 seconds. For a double shot, you'll get roughly 2 ounces of liquid. You'll notice a golden-brown crema layer forming on top, which is a sign of a good espresso.
- Serve: Stop the extraction and remove your cup. Your espresso shot is ready to drink straight away. It will be very strong and concentrated in flavor. (Tip: Espresso is best enjoyed fresh. If it sits too long, the crema will dissipate and the flavors can become bitter.)
Note: Espresso brewing requires some practice and proper equipment. If you don't have an espresso machine, you might explore the Moka Pot (stovetop espresso maker) described below as a strong coffee alternative.
AeroPress
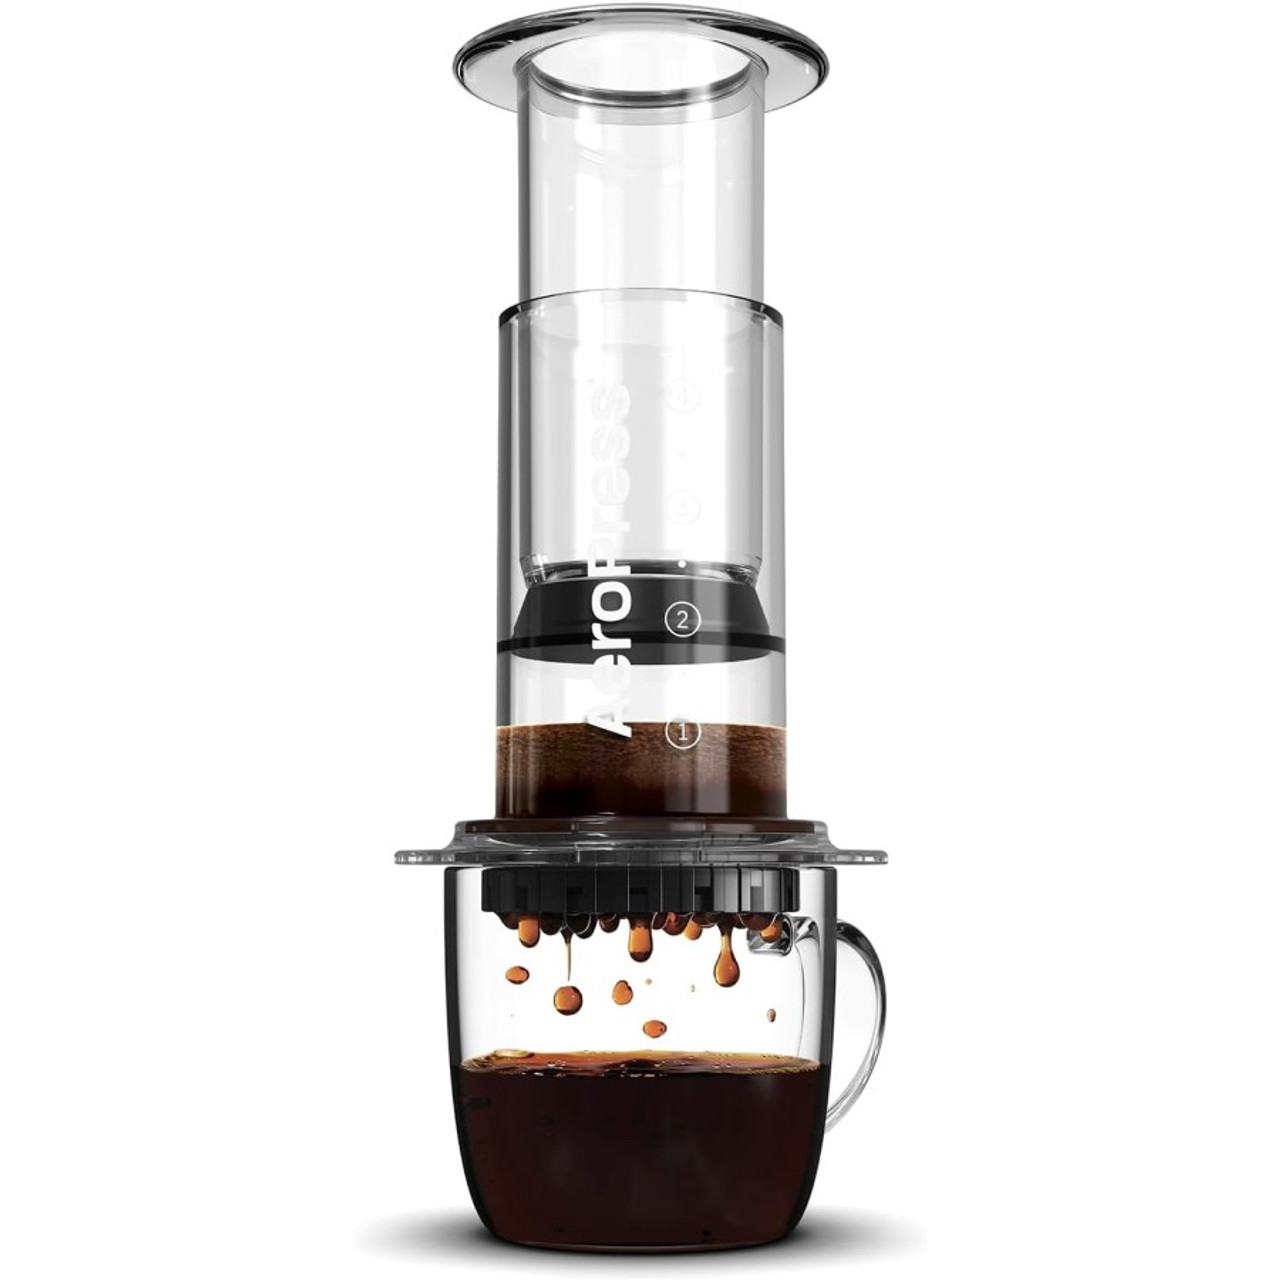
The AeroPress is a modern manual brewer that is compact, quick, and versatile. It combines aspects of immersion brewing and gentle pressure to produce a smooth cup of coffee with very low bitterness. The device looks like a large syringe: coffee and hot water are mixed in a plastic chamber and then pushed through a paper (or fine metal) filter by pressing a plunger. AeroPress coffee can taste rich like a French press but cleaner (thanks to the paper filter). Many fans describe it as "smooth as silk," allowing subtle flavor notes to come through. It's great for making one cup at a time, and you can experiment with it to brew coffee of different strengths (even a concentrated espresso-style shot).
How to Brew (AeroPress):
- Setup: Place a paper filter in the AeroPress filter cap and twist it onto the brewing chamber. Put the chamber on top of a sturdy mug or cup.
- Add Coffee: Add a scoop of medium-fine ground coffee to the chamber (about 1 rounded scoop, ~15–17 grams). Shake gently to level the grounds.
- Add Water: Pour hot water (around 80–90°C, which is a bit cooler than boiling) into the chamber up to the desired mark (the AeroPress has number markings). For a regular cup, fill to around the "2" mark. Give the coffee a quick stir to ensure all grounds are wet.
- Brew and Press: Insert the plunger partway into the chamber to create a seal, and let the coffee steep for about 1 minute (you can adjust steep time to taste). Then, gently press the plunger down. It will push the water through the coffee and filter, into your cup. You'll feel some resistance – slow, steady pressure works best. Stop when you hear a hissing sound (that means you've pressed out all the coffee).
- Dilute and Enjoy: The result in your cup is a smooth, concentrated coffee. You can drink it as-is (it will be stronger than regular drip coffee) or add a bit of hot water to make an Americano-style cup. The flavor is clean and not very bitter, making the AeroPress a favorite for a quick, smooth brew.
Cold Brew
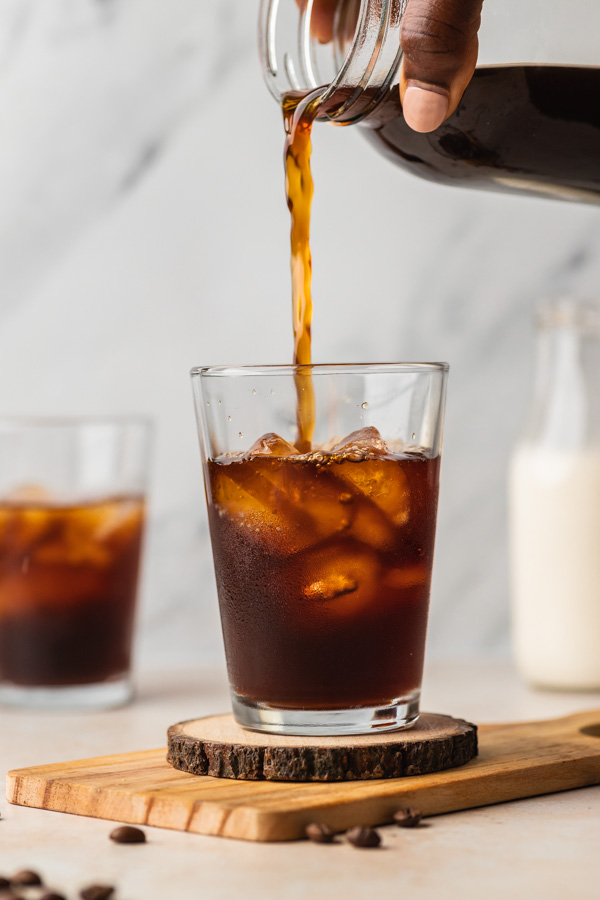
Cold brew is a method of brewing coffee with cold or room-temperature water over a long period (usually several hours). Instead of using hot water, cold brew relies on time to extract flavors from the coffee grounds. The result is a very smooth, low-acidity coffee concentrate that's often served chilled or over ice. Cold brew tends to taste naturally sweeter and less bitter than hot-brewed coffee, and it's a refreshing way to enjoy coffee, especially in warm weather. Because it's made as a strong concentrate, a little cold brew can go a long way – you might dilute it with water or milk when serving.
How to Brew (Cold Brew):
- Combine Coffee and Water: In a large jar or French press, add coarsely ground coffee and cold (or room temp) water. A good starting ratio is about 1 cup of coarse coffee grounds to 4 cups of water (you can adjust strength later). Stir gently to make sure all the grounds are wet.
- Steep for 12–24 Hours: Cover the container and let it sit. You can leave it on the counter for about 12 hours or in the refrigerator for 16–24 hours. The long steeping time allows the coffee to slowly infuse into the water.
- Strain the Coffee: After steeping, filter out the grounds. If you used a French press, simply press the plunger down and pour the coffee out. If using a jar, pour the mixture through a fine mesh sieve or through a coffee filter/cheesecloth into another container. This separates the liquid cold brew concentrate from the used grounds.
- Serve and Store: Your cold brew is concentrated, so you can dilute it to taste. For a classic cold coffee, pour some cold brew over ice and add cold water, milk, or cream as desired. It's very smooth and low in bitterness, with a high caffeine kick, so start with less if you're sensitive. You can also heat the diluted cold brew for a low-acid hot coffee. Store any extra cold brew concentrate in the fridge – it can stay fresh for about a week. Enjoy your smooth cup of cold brew!
Drip Coffee (Auto-Drip Machine)
.jpg)
Drip coffee refers to the standard electric coffee maker found in many kitchens and offices. It's one of the easiest and most common ways to brew coffee. In drip brewing, the machine heats water and disperses it over medium-ground coffee in a paper or reusable filter. The water extracts flavors as it passes through the grounds, then drips into a pot or carafe below. This method produces a clean cup of coffee with a medium body – typically milder and very approachable in flavor. It's not as intense as espresso or French press, but it's smooth and great for making multiple cups at once. Auto-drip machines are loved for their convenience: just add coffee and water, press a button, and let the machine do the work.
How to Brew (Drip Machine):
- Prep the Machine: Place a paper filter in the coffee maker's filter basket (or use the machine's permanent filter if it has one).
- Add Coffee: Scoop in medium-ground coffee. A common guideline is about 1 to 2 tablespoons of coffee per 6 ounces of water (adjust to your taste). For example, for a full 12-cup pot (around 60 ounces of water), you might use roughly 10–12 tablespoons of grounds.
- Add Water: Fill the machine's water reservoir with the desired amount of fresh cold water (the machine will heat it). Many coffee makers have markings to guide you for number of cups.
- Brew: Place the carafe (coffee pot) in position and turn on the machine. Hot water will be pumped up and showered over the coffee grounds. The brewed coffee will drip down into the carafe. This usually takes a few minutes for a full pot.
- Enjoy: Once brewing is complete, you can pour a cup. Drip coffee is usually well-balanced and smooth. If your machine has a hot plate, try not to leave the coffee heating too long after brewing, as it can become bitter. For the best taste, brew only as much as you'll drink fairly soon. Fun fact: Drip coffee makers are extremely popular – auto-drip is by far the most common home brewing method in many countries, thanks to its ease of use.
Siphon (Vacuum Pot) Coffee
 Coffee.jpg)
Siphon brewing is one of the most theatrical and intriguing ways to make coffee. It involves a two-chamber device (often glass) where water in the lower chamber is heated to produce vapor pressure that forces the water up into the upper chamber where the coffee grounds are. After brewing, removing the heat creates a vacuum that pulls the brewed coffee back down through a filter into the lower chamber. The process looks like a science experiment, and it produces a uniquely clean and aromatic cup of coffee. Siphon-brewed coffee is prized for its clarity – it's very clean and crisp in flavor, showing off delicate notes of the coffee bean. Because the coffee is fully immersed in water then filtered, you get a cup that has the rich flavor of immersion brewing but the clear body of a filtered coffee. It's a bit elaborate for everyday use, but a fun way to experience coffee if you have the equipment.
How to Brew (Siphon):
- Setup: Assemble your siphon coffee maker. Add water to the lower chamber (the bulb or bottom pot) – usually enough for the number of cups you want (the device will have a fill line or measurements). Insert the filter in place (siphons often use a cloth or metal filter attached to the bottom of the upper chamber).
- Heat the Water: Place the siphon over its heat source (a burner or alcohol lamp) and start heating the water. As the water boils, you'll see it rise up the siphon tube into the upper chamber. Important: Ensure a good seal between the chambers so the vacuum effect works.
- Add Coffee Grounds: Once the water has moved up top (the lower chamber will look nearly empty of liquid), add medium-grind coffee to the hot water in the upper chamber. Use a spoon to gently stir and make sure all the grounds are saturated. Now the coffee will brew in the upper chamber. Typically, let it brew about 1–2 minutes. Reduce the heat slightly to keep it just gently bubbling (not a hard boil).
- Remove Heat – Create Vacuum: After the brewing time, turn off or remove the heat source. As the bottom chamber cools, a vacuum is formed and it will start pulling the brewed coffee down through the filter. You'll see the coffee filter back down, and the spent grounds will be left in the upper chamber (neat, right?). This siphoning usually happens quickly, in less than a minute.
- Serve: Once the lower chamber is full of brewed coffee and only damp grounds remain up top, your coffee is ready. Carefully remove the hot upper chamber (watch out – it can be very hot). Give the coffee in the lower chamber a final stir and then pour it into cups. Siphon coffee is often described as having a bright, clean taste that really showcases the coffee's aroma and origin flavors. Now sit back and enjoy both the taste and the fact that you just brewed coffee with a vacuum contraption!
Moka Pot (Stovetop Espresso Maker)
.jpg)
The Moka pot is a classic Italian stovetop coffee maker that brews a strong, espresso-like coffee. It's often recognized by its iconic octagonal shape (the traditional Bialetti Moka Express). The Moka pot brews by using steam pressure: water in the bottom chamber heats up and is forced up through a bed of coffee grounds, collecting in the top chamber as brewed coffee. The result is a small pot of very robust, concentrated coffee, richer than drip coffee and somewhat similar to espresso (though typically without the crema). Moka pot coffee has a bold flavor and a dense body – great for those who enjoy intense coffee or want a base for drinks like an Americano. It's sometimes called a "stovetop espresso," and while it doesn't hit the exact pressure of a café espresso machine, it does produce a strong cup (about 1–2 espresso-sized servings per brew).
How to Brew (Moka Pot):
- Fill with Water: Unscrew the Moka pot into its three parts (bottom boiler, coffee funnel, top collector). Pour fresh water into the bottom chamber up to the safety valve (the little metal valve on the side). Do not cover the valve – that's the limit for water.
- Add Coffee: Insert the funnel-shaped filter basket into the bottom chamber. Fill the basket with finely ground coffee (slightly coarser than espresso grind, about the texture of table salt). Level it off, but do not tamp it down – just fill it to the top. Brush any loose grounds off the rim.
- Assemble: Screw the top part (the pot where coffee will collect) onto the base firmly, ensuring a tight seal.
- Heat on Stove: Place the Moka pot on the stove over medium heat. Leave the lid open initially so you can observe. As the water boils in the bottom, pressure will push hot water up through the coffee grounds and you'll see coffee begin to pour out into the top chamber. It will come out in a steady stream.
- Finish Brewing: When the top chamber is about 3/4 full or you hear a gurgling, spurting sound, the coffee is done. Remove the Moka pot from heat (carefully, the handle might be warm). Close the lid and let any final coffee trickle out. Avoid overheating or boiling over – if you hear violent bubbling, it's time to take it off the stove to prevent bitterness.
- Serve: Pour the coffee into small cups. Moka pot coffee will be very strong and bold (you can dilute it with hot water for a milder cup, similar to an Americano). Enjoy the robust, "in-your-face" flavor – a Moka pot creates a concentrated brew with a dense body and intense taste. It's an excellent method if you love espresso but only have a stovetop handy.
Turkish Coffee
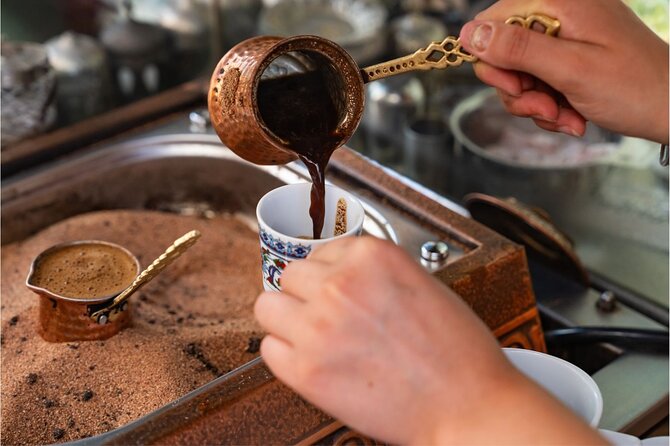
Turkish coffee is a traditional brewing method popular in Turkey, the Middle East, and parts of Eastern Europe. It involves boiling very finely ground coffee in water (often with sugar) to create a strong, unfiltered coffee. The tool used is a small pot called a cezve or ibrik. The coffee grounds used are almost powdery (even finer than espresso grind). During brewing, the coffee forms a foamy layer on top. Turkish coffee is served in small cups, and you typically let the grounds settle at the bottom before sipping. The result is an intensely flavored, thick coffee often enjoyed with a bit of sweetness. Since it's not filtered, the drink has a distinctive velvety texture with fine sediment and a robust taste. It's commonly described as strong and rich; because the grounds remain in the cup, the last sip is left un-drunk (unless you like chewing coffee!). Despite the strength, when brewed well it can be smooth, and people often pair it with something sweet to balance the bitterness.
How to Brew (Turkish Coffee):
- Prepare Ingredients: You'll need an ibrik (cezve), very finely ground coffee (often labeled "Turkish grind"), water, and sugar (if desired). For one small cup (about 3 oz of coffee), use roughly 1 heaping teaspoon of coffee per cup of water. If adding sugar, add it at the start (common options: 1 tsp sugar per cup for medium sweetness, or more/less to taste).
- Mix in the Cezve: Pour cold water into the cezve (e.g., 2 small demitasse cups worth of water if making 2 servings). Add the fine coffee grounds and sugar (if using) to the water before heating. Stir the mixture so the coffee is evenly wet (some prefer not to stir until after heating starts, but either way works).
- Heat Gently: Place the cezve on low to medium heat. Do not leave it unattended – Turkish coffee brews quickly. As it heats, the coffee will dissolve and a dark foam will form on top. Do not let it fully boil, or you'll lose the foam and could scorch the coffee. When you see the coffee beginning to froth and rise (usually just as it's about to boil), remove it from the heat. This is the flavorful foam. You can spoon a little of the foam into each cup (a sign of a well-made Turkish coffee is a good foam).
- Repeat Heating (Optional): Many traditional methods involve bringing the coffee to a froth/near-boil 2 or 3 times for best flavor. To do this, after the first rise, let the coffee settle for a few seconds, then put it back on low heat. Let it foam up again, then remove from heat. Do this one more time if desired, but be careful not to overboil.
- Serve: Gently pour the coffee into small cups, distributing the foam evenly on top of each if possible. Let the cups sit for a minute to allow the fine grounds to settle at the bottom. The coffee will be dark and very strong – sip it slowly. Often Turkish coffee is enjoyed with a glass of water on the side and something sweet. Remember not to drink the last bit in the cup unless you want a mouthful of grounds! The unfiltered nature of Turkish coffee means it has a robust, concentrated flavor and a thicker texture (with fine grit), offering a unique coffee experience.
Final Thoughts
These brewed coffee methods each bring out different qualities in your coffee. There's no single "best" way – it's all about what you enjoy. If you prefer a full-bodied, rich cup, an immersion method like French press or Turkish coffee might be your go-to. For a clean and bright flavor, pour-over or siphon could be perfect. Need convenience for multiple cups? The trusty drip machine has you covered. And for those who love a strong jolt of coffee, espresso or the stovetop Moka pot will deliver intensity in a small package. Feel free to experiment with these methods. Brewing coffee is a journey, and trying different techniques is part of the fun. Happy brewing, and enjoy your coffee exploration!